
Marketing campaigns are the fastest way to reach your clients and leads with a message that matters. Whether you're announcing a promotion, following up after a no-show, or re-engaging clients who haven't visited in a while, Marketing Suite gives you a simple way to get the right message to the right people at the right time.
Every campaign is built from a template, so your branding and messaging stay consistent no matter who on your team is hitting send. You can send to all of your clients at once, narrow your audience down to a specific client group, or send directly to an individual client from their profile. Campaigns can go out immediately or be scheduled in advance, useful for timing a promotion to land on a Monday morning or making sure a class announcement reaches clients before spots fill up.
For email campaigns, you can also resend to clients who didn't open the original, giving your message a second chance to land without creating extra work. Once a campaign is sent, it's tracked in the Marketing Campaigns Report so you can see open rates, click rates, and click-to-open rates for every campaign you send.
Before you begin
Marketing Suite subscription – Campaigns require an active Marketing Suite subscription. For more information, see Manage your Marketing Suite subscription.
Message Center subscription – Sending SMS campaigns requires an active Message Center subscription with a dedicated phone number assigned to your account. For more information, see Manage your Message Center subscription.
Email domain verified – For best deliverability on email campaigns, verify your email domain before sending. For instructions, see Set up your business email settings.
Send a campaign
You can start a campaign from the Templates page, the Overview page, or the Campaigns page. All three take you into the same campaign creation flow.
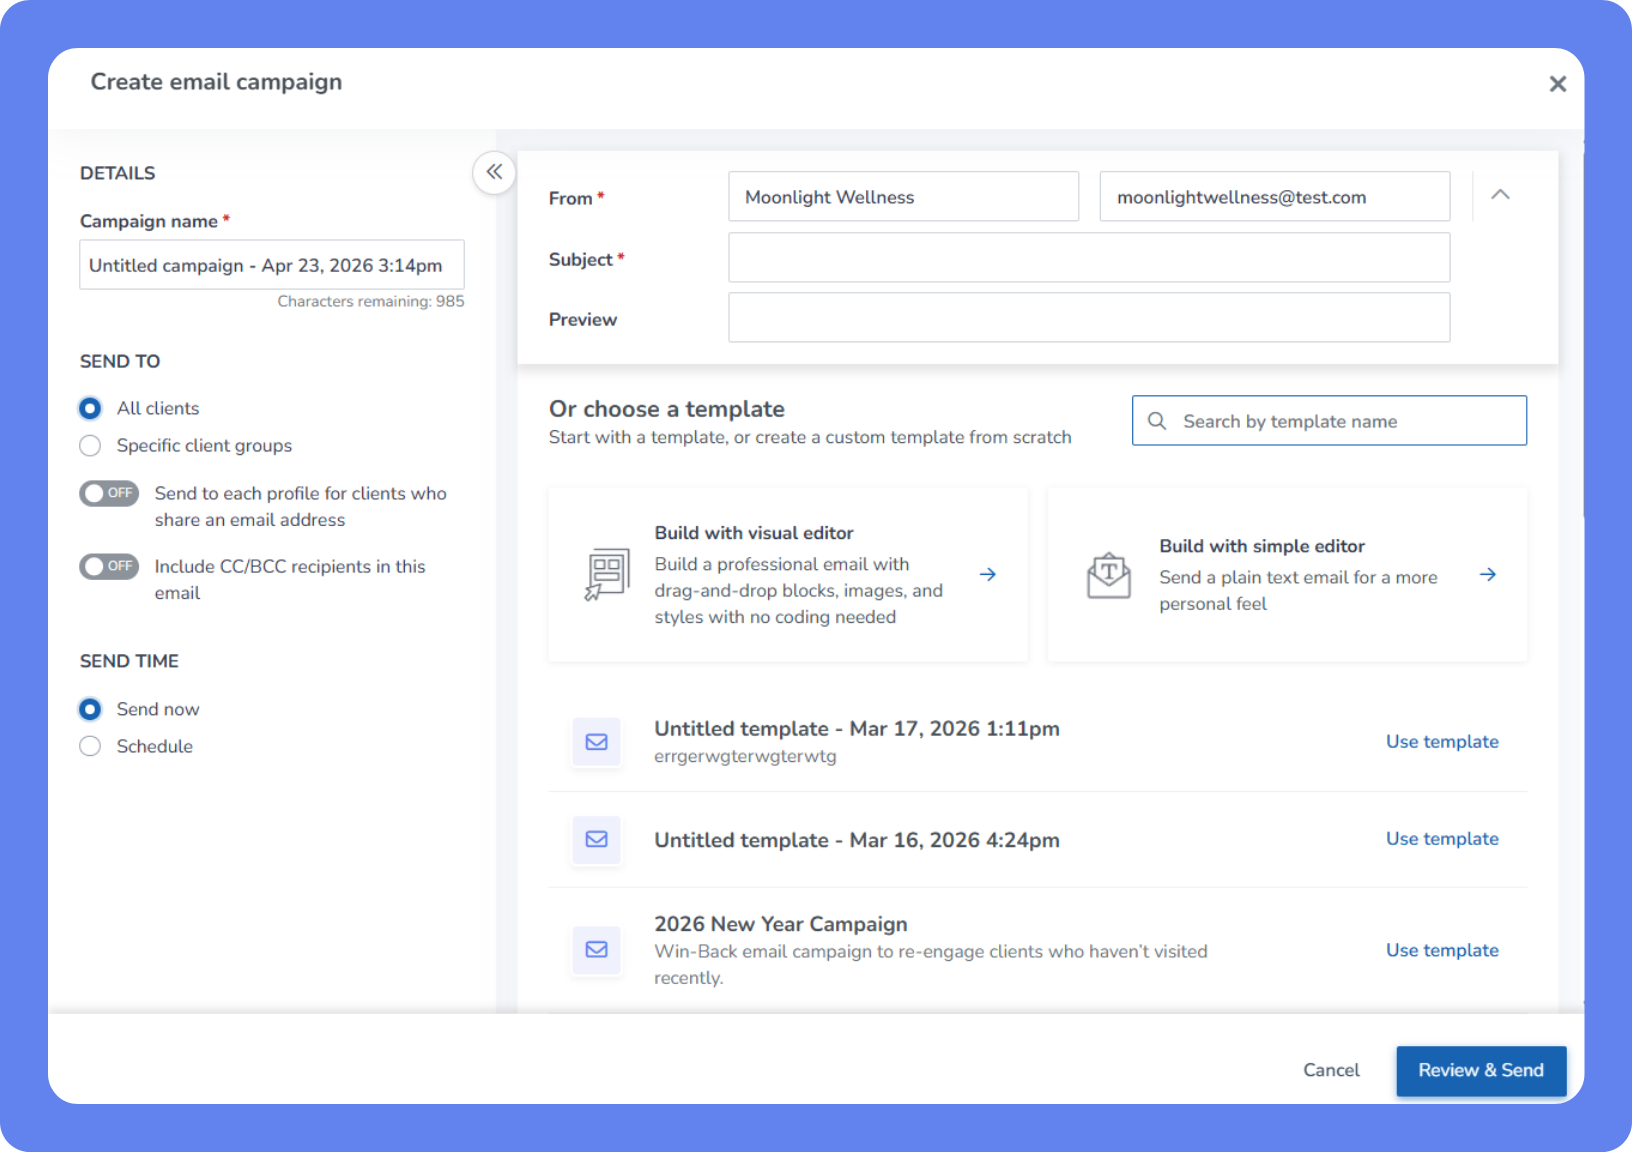
To send a campaign:
Open the App Drawer
 then click View All > Marketing Suite.
Navigate to your preferred starting point and begin a new campaign:
On the Templates page, click Action next to a template and select Use template.
On the Overview page, click Quick Actions and select Send email campaign, Send SMS campaign, or Send Push campaign. Send Push campaign only appears if your business has an active White Label subscription.
On the Campaigns page, click Send campaign, then select Email, SMS, or Push.
Enter a Campaign name.
For email campaigns, this is required.
For SMS and Push campaigns sent from the Overview page, this is also required. These campaigns are automatically tracked in the Marketing Campaigns Report. The field is pre-filled with an auto-generated name based on the date and time, which you can change.
Under Send to, choose who will receive the campaign:
All clients – Sends to all clients in your business.
Specific client groups – Select one or more client group from the list. For example, you could send a special offer to clients who haven't visited in 30 days, or announce a new class only to clients in your Unlimited membership group. You can also use campaigns to secure leads by creating a new leads group and sending free consultation offers or monthly campaigns to stagnant leads. The total number of recipients is shown next to this field.
Note: If you don't select at least one client group, you'll see Select at least one group to continue when you click Review & Send or Review & Schedule. This validation only runs when you submit the form, not while you're filling it out.
If you're sending an email campaign, fill in the following fields:
From name and From email (required).
Subject (required).
Preview text (optional) – A short line of text shown in the client's inbox below the subject line. If left blank, the inbox will display the first line of the email body instead.
Edit the message content as needed. For email and SMS campaigns, click Variables to insert dynamic content such as a client's name or business details.
Need help with what to write? Click Writing Assistant, describe what you want to say, and the Writing Assistant will draft the content for you. Writing Assistant is available with Marketing Suite Pro. For more information, see Generate content with the Writing Assistant.
Under Send time, choose when to send:
Send now – Sends the campaign immediately after you complete the review.
Schedule – Select a date and time. The button label will update to Review & Schedule.
Under Advanced, configure any additional options:
CC/BCC (email only) – Add additional email addresses to copy on the campaign.
Send to each profile sharing an email address (email only) – If multiple client profiles are linked to the same email address, each profile will receive a separate copy of the campaign.
Send to each profile sharing a phone number (SMS only) – If multiple client profiles are linked to the same phone number, each profile will receive a separate copy of the campaign. Neither this option nor the email equivalent is available for Push campaigns.
Track in the Marketing Campaigns Report – Set to ON to record the campaign's performance.
Click Review & Send or Review & Schedule.
In the review panel, check the campaign details and content. Click Continue editing to go back if needed.
Click Send now or Schedule to confirm.
Save campaign content as a template
If you've edited the content of an email campaign and want to reuse it in the future, you can save it as a new template without leaving the campaign creation screen.
To save campaign content as a template:
While editing a campaign, click Save as template.
Enter a name for the new template.
Click Save.
The template is added to your Templates page and available for future campaigns.
Send a campaign from Quick Contact
You can send a campaign to an individual client directly from their profile using Quick Contact. This bypasses the template selection step and takes you straight into the campaign creation flow for the relevant communication type.
To send a campaign from Quick Contact:
Click Search, enter the client's name, then click the client in the list.
Click Contact, then click Email, SMS, or Push.
Select the template you want to use.
Fill in the campaign details and edit the content as needed.
Under Send time, choose Send now or Schedule and select a date and time.
Click Send.
Resend a campaign to clients who didn't open it
For email campaigns, you can resend to clients who received but didn't open the original email. This option is available within 12 hours of the original send.
To resend a campaign to clients who didn't open it:
Open the App Drawer
then click View All > Marketing Suite.
In the Recent campaigns section or the Marketing Campaigns Report, find the sent campaign.
Click Action
 next to the campaign and select Resend to Unopened.
Enter a new Subject line for the resend.
Click Resend.
A new campaign row will appear in your campaign list for the resend.
View campaign performance
Sent campaigns are tracked in the Marketing Campaigns Repor. For each campaign, you can see open rates, click rates, and click-to-open rates.
To view campaign performance:
Open the App Drawer
then click View All > Reports > Marketing > Marketing Campaigns.
View or edit a campaign
To view or edit a campaign:
Open the App Drawer
then click View All > Marketing Suite.
In the Recent campaigns section or the Marketing Campaigns Report, find the campaign.
Click Action next to the campaign and select View to review the details, or Edit to make changes.
If the campaign hasn't been sent, you can edit the details and resave. Campaigns that have already been sent are view-only.
Cancel a campaign
You can cancel a campaign that is scheduled to send or currently in the process of sending. Canceling a scheduled campaign removes it from the queue entirely. Canceling a campaign that is actively sending stops it from going out to any remaining recipients. Clients who have already received it won't be affected.
To cancel a campaign:
Open the App Drawer
then click View All > Marketing Suite.
In the Recent campaigns section or the Marketing Campaigns Report, find the campaign.
Click Action next to the campaign and select Cancel.
In the confirmation popup, click Cancel campaign.
If the campaign was scheduled, it will be removed from the queue.
If the campaign was actively sending, it will stop immediately. Clients who already received it won't be affected.
The campaign status is updated to Canceled and will remain visible in the Marketing Campaigns Report for reference.
Remove a recipient from a campaign
You can remove individual clients from a scheduled campaign before it sends. Removed clients won't receive the campaign even if they're still part of the selected client group.
To remove a recipient from a campaign:
Open the App Drawer
then click View All > Marketing Suite.
In the Recent campaigns section or the Marketing Campaigns Report, find the scheduled campaign and click its name to open the recipient list.
Find the client you want to remove. Use the search bar to look them up by name if needed.
Click Action next to the client and select Remove Recipient.
In the confirmation popup, click Remove.
Delete a campaign
You can delete scheduled or failed campaigns to keep your campaign list organized. Sent campaigns can't be deleted.
To delete a campaign:
Open the App Drawer
then click View All > Marketing Suite.
In the Recent campaigns section or the Marketing Campaigns Report, find the campaign you want to delete.
Click Action next to the campaign and select Delete.
In the confirmation popup, enter a reason for deleting the campaign.
Click Delete.
Next steps
Once your campaigns are running, templates and automations can help you scale your outreach without extra effort.