
To access your add-ons, open the App Drawer  then click View All > Setup > Add-Ons. Click Get started or Manage under any add-on.
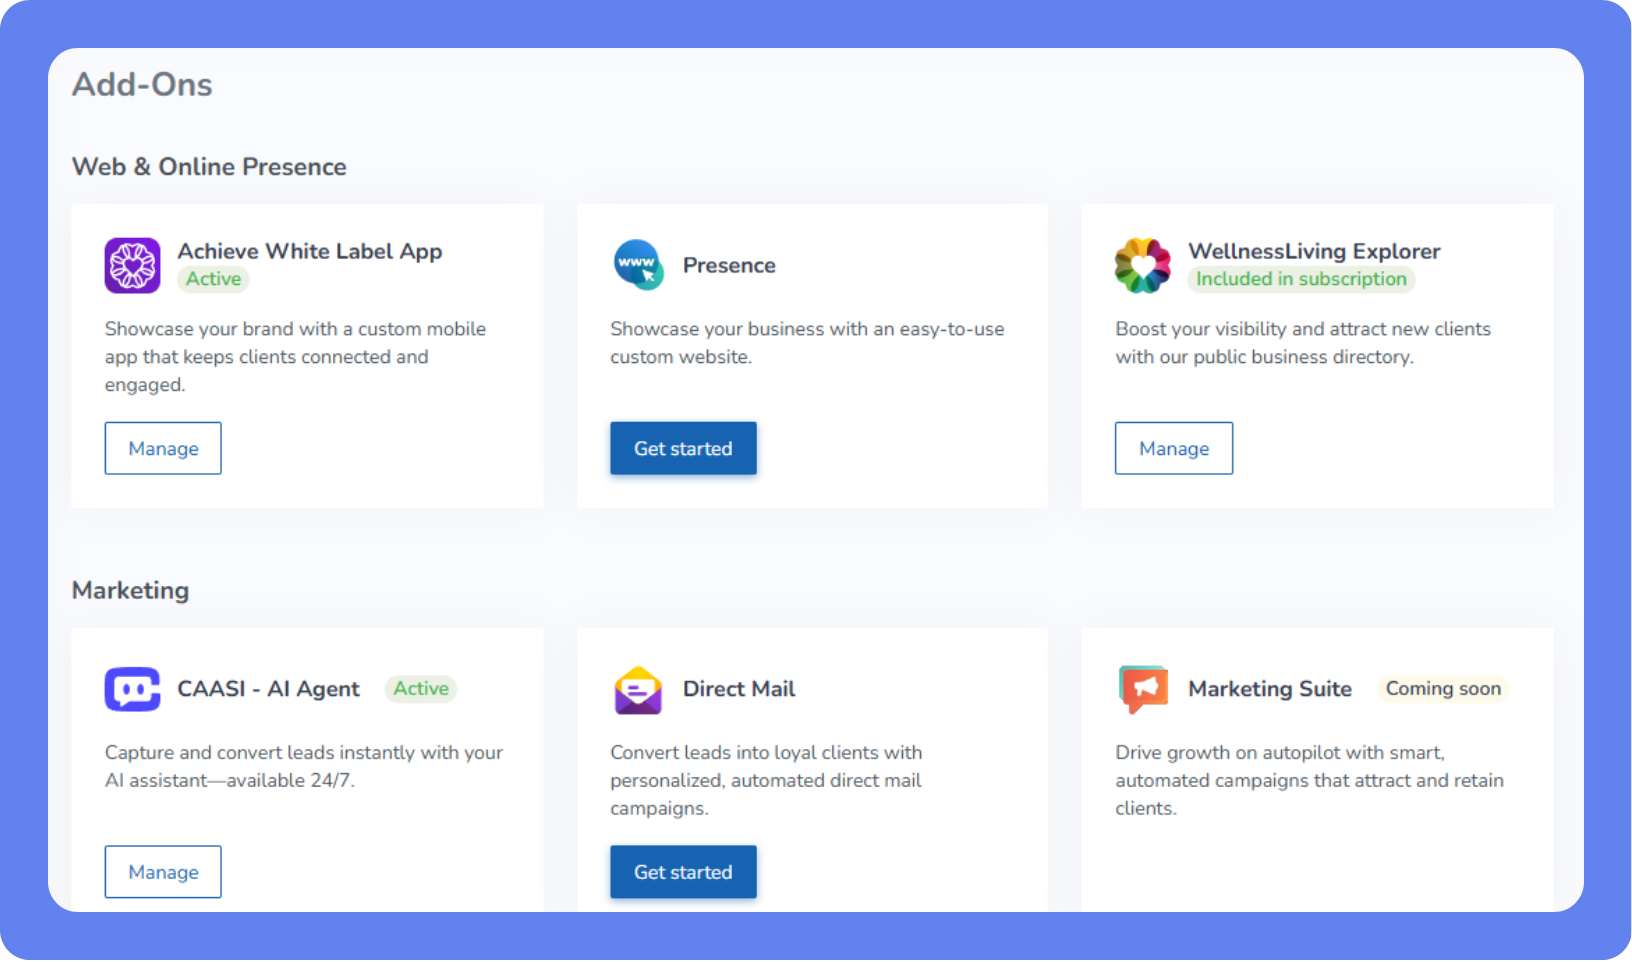
The Add-Ons page is your central hub for managing every add-on feature and subscription available for your WellnessLiving business. From branded client experiences to powerful marketing tools and advanced business integrations, you can view what’s included in your subscription, activate new features, start free trials, and manage your active services all in one place.
Use this page to expand your capabilities, streamline your operations, and drive growth with tools designed to support every area of your business; including client engagement, marketing automation, virtual services, business operations, and finance.
Manage your Achieve Client App subscription
The Achieve Client App is WellnessLiving’s branded mobile app that allows clients to book services, manage their schedule, make purchases, and access your business from their mobile devices. It helps you stay connected with clients while providing a convenient, on-the-go booking experience.
WellnessLiving offers two subscription plans for the app: Basic and White Label. Compare the plans for more information.
To manage your Achieve Client App subscription:
Open your subscription page:
Open the App Drawer
then click View All > Setup > Add-Ons. Under Achieve, click Get started or Manage.
Open the App Drawer
then click View All > Achieve.
Click See Plans or Subscription plans.
Under White Label, click Get Started, then click Confirm.
After upgrading your Achieve Client App plan to White Label, our dedicated App Support team will help you through the process of designing and building your custom branded app. If you’d like to help design the app, see Achieve Client App: Making customizations.
Compare the Achieve Client App plans
The differences between the Basic and White Label plans are listed in the table below.
Features | Basic | White Label |
|---|---|---|
No competitor ads | YES | YES |
Clients can book Appointments and Classes | YES | YES |
Event and workshop registration | NO | YES |
Clients can book equipment with BOOK-A-SPOT asset layout | YES | YES |
Clients can book a BOOK-A-SPOT asset individually from services | NO | YES |
Clients can register new accounts | NO | YES |
Clients can view services before registering for an account | NO | YES |
Rewards & loyalty program | YES | YES |
Client reviews | YES | YES |
On-demand push notifications | NO | YES |
Automatic push notifications | NO | YES |
Digital signatures for contracts and waivers | YES | YES |
Dedicated download on the Apple App Store and Google Play | NO | YES |
Configure colors, fonts, and splash screen | NO | YES |
Custom thumbnail icon | NO | YES |
Configure the name of your app | NO | YES |
Exclusive branding | NO | YES |
Your own Apple Developer’s Account | NO | YES |
Track key metrics such as total downloads, impressions, and devices used by your clients | NO | YES |
White Label Achieve Client App Fees
The fees you are required to pay when you upgrade to the White Label Achieve Client App plan are listed in the table below.
Fee | Amount | Description |
|---|---|---|
Monthly White Label fee | $209 USD per location | A monthly fee charged by WellnessLiving for the White Label plan. |
Annual maintenance fee | $150 USD | An annual fee charged by WellnessLiving for the initial design and build of a business’s custom Android or iOS app. This fee covers the initial submission of the app to Google Play or the App Store and any ongoing maintenance to the app, such as fixing bugs and applying updates. |
Apple’s annual membership fee | $99 USD | An annual membership fee charged by Apple to allow their developer members to maintain access to building and distributing apps for iOS. |
App customization fee | $159 USD | A fee charged by WellnessLiving whenever a business requests design changes to their custom app and the app needs to be rebuilt and resubmitted to Google Play or the App Store. For more information, see Achieve Client App: Making customizations. |
Manage your Presence subscription
Presence is our managed website solution that provides your business with a professionally designed, branded site integrated with WellnessLiving. WellnessLiving offers two subscription plans for Presence: Premium and Enterprise. Review the plans for more information.
To manage your Presence subscription:
Open your subscription page:
Open the App Drawer
then click View All > Setup > Add-Ons. Under Presence, click Get started or Manage.
Open the App Drawer
then click View All > Presence.
Click See Plans.
Click Get Started under the plan that you want for your business.
A request will be sent to our Sales Team and they will reach out to you to go over the next steps and any questions you may have.
Presence initial setup fees
Service | Fee | Description |
|---|---|---|
Convert your site | $349 | If you’d like to convert an existing website into a Presence custom website, you’ll be required to pay a one-time setup fee. This fee includes support from a Presence Website Expert, up to three revision calls with our Presence team, access to a live preview of the website, and simultaneous launch in accordance with your scheduled go-live date. |
Build a new site | $699 | If you’d like to build a new custom website from scratch, you’ll be required to pay a one-time setup fee. This fee includes everything included in the Convert your site service, plus two additional revision calls with our Presence team, your choice of images, and SEO-friendly copywriting. |
Presence subscription plans and fees
Plan | Fee | Description |
|---|---|---|
Premium | $199 per month per location | The Premium plan provides you with everything included in the Basic plan, plus a blog, Google Analytics, enhanced SEO, and an SEO audit. |
Enterprise | To obtain a price quote for the Enterprise plan, please contact WelllnessLiving Support. | The Enterprise plan provides you with everything included in the Basic and Premium plans, plus multi-location and Enterprise Cloud support, an integrated location finder, Enterprise optimization, and the ability to push all customizations to your Enterprise Locations. |
Manage your WellnessLiving Explorer listings
When you enable your WellnessLiving Explorer listing, a profile for your business is added to WellnessLiving Explorer, a searchable directory of businesses that uses WellnessLiving.
There is no additional cost for enabling this feature.
To manage your WellnessLiving Explorer listing:
Open the App Drawer
then click View All > Setup > Add-Ons. Under WellnessLiving Explorer, click Manage.
Set listings to ON to publish them, or to OFF to hide them.
After enabling, your listing may take 24 hours to appear on WellnessLiving Explorer.
After disabling, your listing may take 24-48 hours to be hidden from Google search results. If it still appears after 48 hours, contact WellnessLiving support.
To copy a published listing URL, click Copy to clipboard

To edit a published listing URL, click Edit
 and enter the new URL, then click Confirm
Manage your CAASI subscription
CAASI is available as an add-on to your WellnessLiving subscription and can be activated or deactivated at any time.
CAASI is available in two subscription tiers:
Chat Agent | Phone Agent | |
|---|---|---|
Price | $99 per location/month | $299 per location/month |
Answer client questions | ✓ | ✓ |
Lead capture | ✓ | ✓ |
Check account balance | ✓ | ✓ |
Website URL training data | ✓ | ✓ |
Book services | ✓ | ✓ |
Cancel bookings | ✓ | ✓ |
Leave wait lists | ✓ | ✓ |
Find and link to store purchases | ✓ | ✓ |
Document uploads | ✓ | ✓ |
FAQ/snippet training data | ✓ | ✓ |
Custom response guidelines | ✓ | ✓ |
Booking and Cancellations reports | ✓ | ✓ |
Services booked and drop-off analytics | ✓ | ✓ |
Phone calls | ✓ | |
Voice customization | ✓ | |
Missed calls | ✓ | |
Live call transfer to staff | ✓ |
To manage your CAASI - AI Agent subscription:
To manage your CAASI subscription:
Open your subscription page:
Open the App Drawer
then click View All > Setup > Add-Ons. Under CAASI - AI Agent, click Get started or Manage.
Open the App Drawer
then click View All > CAASI.
To subscribe to CAASI, click Subscribe > Confirm.
To unsubscribe from CAASI, click Deactivate or Unsubscribe, then click Confirm Opt-Out.
To upgrade from Chat Agent to Phone Agent:
Open the App Drawer
then click View All > Setup > Add-Ons. Under CAASI - AI Agent, click Manage.
Select the Phone Agent tier, then click Subscribe.
Click Confirm. Your subscription upgrades immediately. All existing settings, conversation history, training data, and branding carry over automatically with nothing reset.
Enable Direct Mail
Direct mail allows you to send customized physical postcards to your clients. You can use postcards to keep in touch with clients near the holidays, on their birthdays, or to let them know about special promotions.
Direct mail has a fee of $0.80 USD for each postcard sent in a direct mail campaign.
To enable direct mail campaigns, follow these steps:
Open your Direct Mail page:
Open the App Drawer
then click View All > Setup > Add-Ons. Under Direct Mail, click Get started or Manage.
Open the App Drawer
then click View All > Direct Mail.
Click Start Now.
In the confirmation popup, click Start Now. You can now manage and send direct mail campaigns.
Manage your Marketing Suite subscription
The Marketing Suite is WellnessLiving's all-in-one marketing platform that gives you the tools to attract, engage, and retain clients through automated workflows, targeted campaigns, and lead management. With the Marketing Suite, you can build email, SMS, and push notification campaigns, set up automated flows that run in the background, manage your leads through a dedicated pipeline, and track performance across all your marketing activity.
To access the Marketing Suite, you must have an active subscription. If you aren’t already signed up for Marketing Suite, follow the instructions below to learn how.
Subscribe to the Marketing Suite
To subscribe to the Marketing Suite:
Open the App Drawer
then click View All > Setup > Add-Ons. Under Marketing Suite, click Get started or Manage.
Review the available plans and click Subscribe under the plan you want.
In the confirmation popup, click Confirm & Upgrade.
If your business is currently on a free trial, you won't be charged until the trial ends. You can cancel anytime before then. If your business has already used a free trial, you'll be billed immediately on subscribing.
Cancel your Marketing Suite subscription
To cancel your Marketing Suite subscription:
Open the App Drawer
then click View All > Setup > Add-Ons. Under Marketing Suite, click Manage.
Click Cancel subscription.
Follow the prompts to confirm the cancellation.
When your subscription ends, you lose access to bulk email campaigns, all automations, campaign scheduling, the visual editor, and AI writing assistance. You keep access to one-to-one emails, the basic text editor, transactional notifications, a basic Lead Management Report, client groups, and Message Center (if you have a separate subscription).
You'll lose access to Marketing Suite features at the end of your current billing period.
Manage your Message Center subscription
Message Center is WellnessLiving's two-way SMS inbox. It's sold as a separate subscription and can be used on its own or alongside Marketing Suite to power SMS automations. Once you subscribe, you'll complete a short setup process to get your dedicated phone number.
WellnessLiving offers several subscription plans for Message Center. Review the plans for the US and Canada or Australia and the UK for more information.
Subscribe to Message Cente
To subscribe to Message Center:
Open the App Drawer
then click View All > Setup > Add-Ons.
Under Message Center, click Get started.
Under Choose your plan, select the plan that fits your expected monthly message volume, then click Get started under that plan. For details on available plans, see the pricing tables below.
In the Confirm upgrade dialog, review the plan details, prorated charge for the current billing period, and your next regular billing date. Click Confirm upgrade.
Continue with the next step that applies to your region:
If you're in the US, complete SMS registration to get your dedicated phone number. See Complete SMS registration (US only) below.
If you're in the UK or Australia, submit a regulatory application so your phone number can be generated. See Submit a regulatory application (UK and Australia) below.
If you're in Canada, continue to Choose your phone number.
Other ways to start setup
You can also start the Message Center setup flow from a couple of other places in WellnessLiving.
To start setup from a client profile:
On a client's profile, click Quick Contact > SMS.
In the Set up your Message Center prompt, click Set up Message Center.
Continue with the steps in Subscribe to Message Center above.
To start setup from the Marketing Suite overview:
Open the App Drawer then click Marketing Suite.
In the Message Center banner at the top of the page, click the link to start setup.
Continue with the steps in Subscribe to Message Center above.
Complete SMS registration (US only)
If your business is based in the US, you'll need to complete A2P 10DLC registration before sending or receiving any SMS. You can start registration during initial setup, or any time afterward from the Message Center page.
For full details on the registration process, see Enrolling for A2P 10DLC (US businesses only).
Submit a regulatory application (UK and Australia)
UK and Australian customers must submit a regulatory application before a phone number can be generated. This is a compliance requirement that helps your business avoid SMS filtering and delivery issues.
You won't be billed for your Message Center subscription until your application is approved.
For complete details and document examples, see Submitting a regulatory application for Message Center.
Choose your phone number
Once your registration or regulatory bundle is approved (or, for Canadian businesses, once your plan is active), you'll choose a dedicated phone number for your business.
To choose your phone number:
Open the App Drawer
then click View All > Message Center.In the Phone number section, enter your 3-digit area code and click Generate.
Select an available number from the list, then click Save.
Upgrade your plan
To upgrade your plan:
Open the App Drawer
then click View All > Setup > Add-Ons.
Under Message Center, click Manage.
Under Choose your plan, click Get started under the plan you want.
In the Confirm upgrade dialog, review the plan details, prorated charge for the current billing period, and your next regular billing date. Click Confirm upgrade.
Cancel your subscription
To cancel your subscription:
Open the App Drawer
then click View All > Setup > Add-Ons.
Under Message Center, click Manage.
Click Cancel subscription.
Review the cancellation details, then confirm to proceed.
Message Center subscription plans and fees for the US and Canada 🇺🇸🇨🇦
Plan | Description |
|---|---|
SMS Message Center 500 | This plan is priced at $19 USD per month and it allows you to send and receive 500 marketing SMS messages per month. Overage charges of $0.050 USD will apply for each additional marketing message sent or received above the monthly limit. |
SMS Message Center 1000 | This plan is priced at $39 USD per month and it allows you to send and receive 1000 marketing SMS messages per month. Overage charges of $0.040 USD will apply for each additional marketing message sent or received above the monthly limit. |
SMS Message Center 2500 | This plan is priced at $89 USD per month and it allows you to send and receive 2500 marketing SMS messages per month. Overage charges of $0.035 USD will apply for each additional marketing message sent or received above the monthly limit. |
SMS Message Center 5000 | This plan is priced at $149 USD per month and it allows you to send and receive 5000 marketing SMS messages per month. Overage charges of $0.030 USD will apply for each additional marketing message sent or received above the monthly limit. |
SMS Message Center 10000 | This plan is priced at $249 USD per month and it allows you to send and receive 10,000 marketing SMS messages per month. Overage charges of $0.025 USD will apply for each additional marketing message sent or received above the monthly limit. |
SMS Message Center 25000 | This plan is priced at $375 USD per month and it allows you to send and receive 25,000 marketing SMS messages per month. Overage charges of $0.015 USD will apply for each additional marketing message sent or received above the monthly limit. |
Enterprise | For more information on this plan and its pricing, contact WellnessLiving. |
Message Center subscription plans and fees for Australia and the UK 🇦🇺🇬🇧
Plan | Description |
|---|---|
SMS Message Center 500 | This plan is priced at $50 USD per month and it allows you to send and receive up to 500 transactional and marketing SMS messages per month. Overage charges of $0.100 USD will apply for each additional marketing message sent or received above the monthly limit. |
SMS Message Center 1000 | This plan is priced at $75 USD per month and it allows you to send and receive 1000 transactional and marketing SMS messages per month. Overage charges of $0.075 USD will apply for each additional marketing message sent or received above the monthly limit. |
SMS Message Center 2500 | This plan is priced at $120 USD per month and it allows you to send and receive 2500 transactional and marketing SMS messages per month. Overage charges of $0.048 USD will apply for each additional marketing message sent or received above the monthly limit. |
SMS Message Center 5000 | This plan is priced at $200 USD per month and it allows you to send and receive 5000 transactional and marketing SMS messages per month. Overage charges of $0.040 USD will apply for each additional marketing message sent or received above the monthly limit. |
SMS Message Center 10000 | This plan is priced at $350 USD per month and it allows you to send and receive 10000 transactional and marketing SMS messages per month. Overage charges of $0.035 USD will apply for each additional marketing message sent or received above the monthly limit. |
Enterprise | For more information on this plan and its pricing, contact WellnessLiving. |
Manage your Rewards Program
The Rewards Program allows you to award clients with rewards points for eligible actions, which they can redeem for prizes. You can manage your Rewards Program by activating or deactivating the program, and adjusting how clients earn and redeem rewards points.
There is no additional cost for enabling this feature.
To manage your Rewards Program:
Open your subscription page:
Open the App Drawer
then click View All > Setup > Add-Ons. Under Rewards, click Get started or Manage.
Open the App Drawer
then click View All > Rewards.
To enable your Rewards Program, set Activate Rewards to ON.
Customize your Rewards Program with rewards points and redeemable prizes.
To disable your Rewards Program, set Activate Rewards to OFF.
In the confirmation popup, click Deactivate.
Manage your FitBUILDER subscription
FitBUILDER is a WellnessLiving add-on that gives you the tools to create and update workouts of the day (WODs) for your clients for $49 per month.
To manage your FitBUILDER subscription:
Open your subscription page:
Open the App Drawer
then click View All > Setup > Add-Ons. Under FitBUILDER, click Get started or Manage.
Open the App Drawer
then click View All > FitBUILDER.
To subscribe to FitBUILDER:
Review the pricing and other information, then click Get Started.
In the confirmation popup, click Continue.
Once you’ve subscribed, open FitBUILDER to begin building your workouts.
To view your existing subscription:
On the side menu, click Subscription Plans. Your Next Billing Date and Next Billing Amount are listed.
Manage your FitLIVE subscription
FitLIVE is a Zoom integration that lets you host virtual meetings directly through WellnessLiving, without using a separate third-party website. WellnessLiving offers three subscription plans for FitLIVE: Basic, Advanced, and Professional. Review the plans for more information.
To manage your FitLIVE subscription:
Open your subscription page:
Open the App Drawer
then click View All > Setup > Add-Ons. Under FitLIVE, click Get started or Manage.
Open the App Drawer
then click View All > FitLIVE.
To change your plan:
Under Pricing Made Simple, click Get Started below the subscription plan you want.
If you choose the Basic or Advanced subscription, sign in with your Zoom credentials. Once signed in, the integration will be ready for you to use in WellnessLiving.
If you choose the Professional subscription, enter the number of licenses you need. WellnessLiving will handle this process for you and create a business-specific Zoom account with all the extra benefits that come with this tier. The integration will be ready for you to use once your subscription is confirmed.
Click Confirm.
To unsubscribe:
Click Disconnect. The integration will be automatically removed from your business.
FitLIVE subscription plans and fees
Plan | Description |
|---|---|
Basic | This plan is free and requires businesses to connect to a Zoom account that has a Zoom Basic license. Each business can only connect to one Zoom Basic license and host one meeting at a time. With the Basic plan, businesses can host meetings for as long as 40 minutes with up to 100 participants. |
Advanced | This plan is priced at $19 USD per month per location and requires businesses to connect to a Zoom account that has a Zoom Pro license or higher. With the Advanced plan, businesses can enjoy all the benefits that come with the Basic plan, plus host simultaneous meetings and include over 100 participants (Zoom Business or Enterprise licenses required) in a meeting. |
Professional | The plan is priced at $29 USD per month per license and doesn’t require any Zoom license. Each business can host up to 99 meetings at the same time, depending on the number of FitLIVE licenses they have. With the Professional plan, businesses can enjoy all the benefits that come with the Basic and Advanced plans, plus the ability to purchase licenses and customize meetings from WellnessLiving, host up to 300 participants, and automatically upload meetings to FitVID on Demand. |
Manage your FitVID subscription
FitVID on Demand allows you to upload and store videos in WellnessLiving. Clients can watch your videos through the Client Portal or the Achieve Client App.
WellnessLiving offers three subscription plans for FitVID on Demand: Basic, Premium, and Enterprise. Review the plans for more information.
To manage your FitVID subscription:
Open your subscription page:
Open the App Drawer
then click View All > Setup > Add-Ons. Under FitVID, click Get started or Manage.
Open the App Drawer
then click View All > FitVID > Subscription Plan.
Click Upgrade or Get started.
In the confirmation pop-up, click Confirm.
FitVID on Demand subscription plans and fees
Plan | Description |
|---|---|
Basic |
|
Premium |
|
Enterprise | This plan is available to Enterprise Cloud businesses and allows you to upload unlimited videos. For more information on this plan and its price, contact WellnessLiving. |
Manage your API Access
To manage your API Access, review Getting Started with the WellnessLiving API.
Manage your Finance connections
With the Finance feature, you can streamline your financial workflow directly within WellnessLiving.
Finance connects your QuickBooks Online account to your All Sales Report in WellnessLiving and automatically imports your data daily, which eliminates the need to enter it manually and keeps your records accurate and up to date.
If you’re a QuickBooks Desktop user, you will need to convert to QuickBooks Online. To learn how to do this, consult either of these articles from the Intuit Help Center:
To manage your Finance subscription:
Open your subscription page:
Open the App Drawer
then click View All > Setup > Add-Ons. Under Finance, click Get started or Manage.
Open the App Drawer
then click View All > Finance.
To connect to QuickBooks Online:
Click Get started.
Select the I have read and accept the terms of service checkbox and click Yes, let’s proceed.
Click Connect Account.
If you’re a US customer, and don’t have an existing QuickBooks Online account, create an account to proceed.
Non-US customers must buy a plan through the official QuickBooks website or an authorized provider.
Click Next.
Click Connect account.
Under Connection name, enter QuickBooks Online, then click Proceed to sign in.
Enter your QuickBooks Online login credentials and click Sign in.
Under Default bank account for credit card payments, select one of the active chart of accounts from your QuickBooks Online account to record the deposits for credit card and bank payments from WellnessLiving. For more information, see Finance settings.
Don’t click the close button on top of the screen at this point. Doing this will cause the setup to fail. If you’ve clicked this button, please contact WellnessLiving Support.
Set the notification toggle switches to ON or OFF depending on your preferences.
Under Notification Recipients, enter the email address of the person who will be notified whenever an Auty-mation is successful and/or unsuccessful. Separate more than one email address with a comma.
Click Finish.
To disconnect from QuickBooks Online:
Click View Dashboard.
Click Connections, then click Disconnect under the QuickBooks Online account you want to disconnect.
QuickBooks Online integration
The QuickBooks Online integration connects your WellnessLiving account directly to QuickBooks Online, syncing your sales, payments, and refunds automatically. It's available as a paid add-on at $39 USD per month, billed as a flat rate per business regardless of how many locations you have.
To subscribe and connect for the first time, see QuickBooks Online integration.
Cancel your QuickBooks Online subscription
Canceling your subscription stops billing immediately and disconnects your QuickBooks connection at the same time.
To cancel your QuickBooks Online subscription:
Open the App Drawer
then click View All > Setup > Integrations > QuickBooks.
Under Subscription details, click the Cancel subscription link.
On the Cancel QuickBooks Online Subscription page, click Cancel subscription.
In the popup, select a reason for canceling, then click Deactivate QuickBooks to confirm.
Billing stops immediately and your QuickBooks connection is disconnected. Your mapping settings are preserved. If you resubscribe later, you won't need to redo your setup. For more information on reconnecting, see QuickBooks Online integration.
Manage your Forms subscription
The Forms feature allows you to create, customize, and manage digital forms that clients can complete online. You can use Forms to collect important information, such as waivers, contracts, health details, and intake information, and link them to services, Purchase Options, or client profiles.
WellnessLiving subscribers to the business plan or higher have included access to Forms.
For an additional $49/month, the upgraded plan allows you to:
Automatically embed Forms with your existing services and Purchase Options.
Create and send unlimited forms.
View and track client responses.
Send direct links and reminders to clients.
To manage your Forms subscription:
Open your subscription page:
Open the App Drawer
then click View All > Setup > Add-Ons. Under Forms, click Get started or Manage.
Open the App Drawer
then click View All > Forms > Subscription plans.
To upgrade your subscription plan, click Start Trial under the plan.
In the confirmation pop-up, click Confirm.