
This article outlines how to customize the appearance and behavior of CAASI. For more information, see the Complete Guide to CAASI, Your AI Assistant.
Customize CAASI's appearance
To customize CAASI's appearance:
Open the App Drawer
 then click View All > CAASI.
Click Open CAASI Communication Hub.
On the side menu, click Application Settings

To modify settings for your White Label Achieve Client App, click Channel Settings > Achieve.
To modify settings for CAASI on your website, click Channel Settings > Webchat Widget.
A live preview of all of your selections appears on the right side of the screen.
Customize Achieve Client App settings
Your Achieve Client App settings are where you choose what clients see before beginning a conversation with CAASI on the Achieve Client App:
The AI Agent Name you set up in CAASI Preferences appears. To change the name, see Customize CAASI’s personality.
To pause CAASI on Achieve, enable the Pause CAASI option. This won’t affect CAASI on your website.
Enter the Welcome tooltip header that appears in Achieve the first time clients open it after CAASI is added.
Enter the Welcome tooltip text that appears when clients open CAASI.
Enter the Welcome Message CAASI sends to prompt clients to begin a conversation.
Under Quick Replies:
Click-and-drag replies to change the order they appear.
Modify the Suggestions Header, Suggestions Text, and Action of existing replies. The Suggestions Header and Suggestions Text appear to clients when chatting with CAASI. The Action is what CAASI responds to when the reply is selected.
Click Delete to remove any replies.
Click Add Row and enter the information for the reply.
Click Save.
Customize CAASI’s widget appearance
You have full control over how clients experience CAASI across your website and Client Portal.
Customize what clients see before starting a conversation to set expectations and guide engagement from the outset.
You can also tailor the in-conversation experience, ensuring messaging stays clear, helpful, and aligned with your brand.
To make interactions even smoother, use Quick Replies to create predefined text options that clients can simply click, making it faster and easier for them to respond to CAASI.
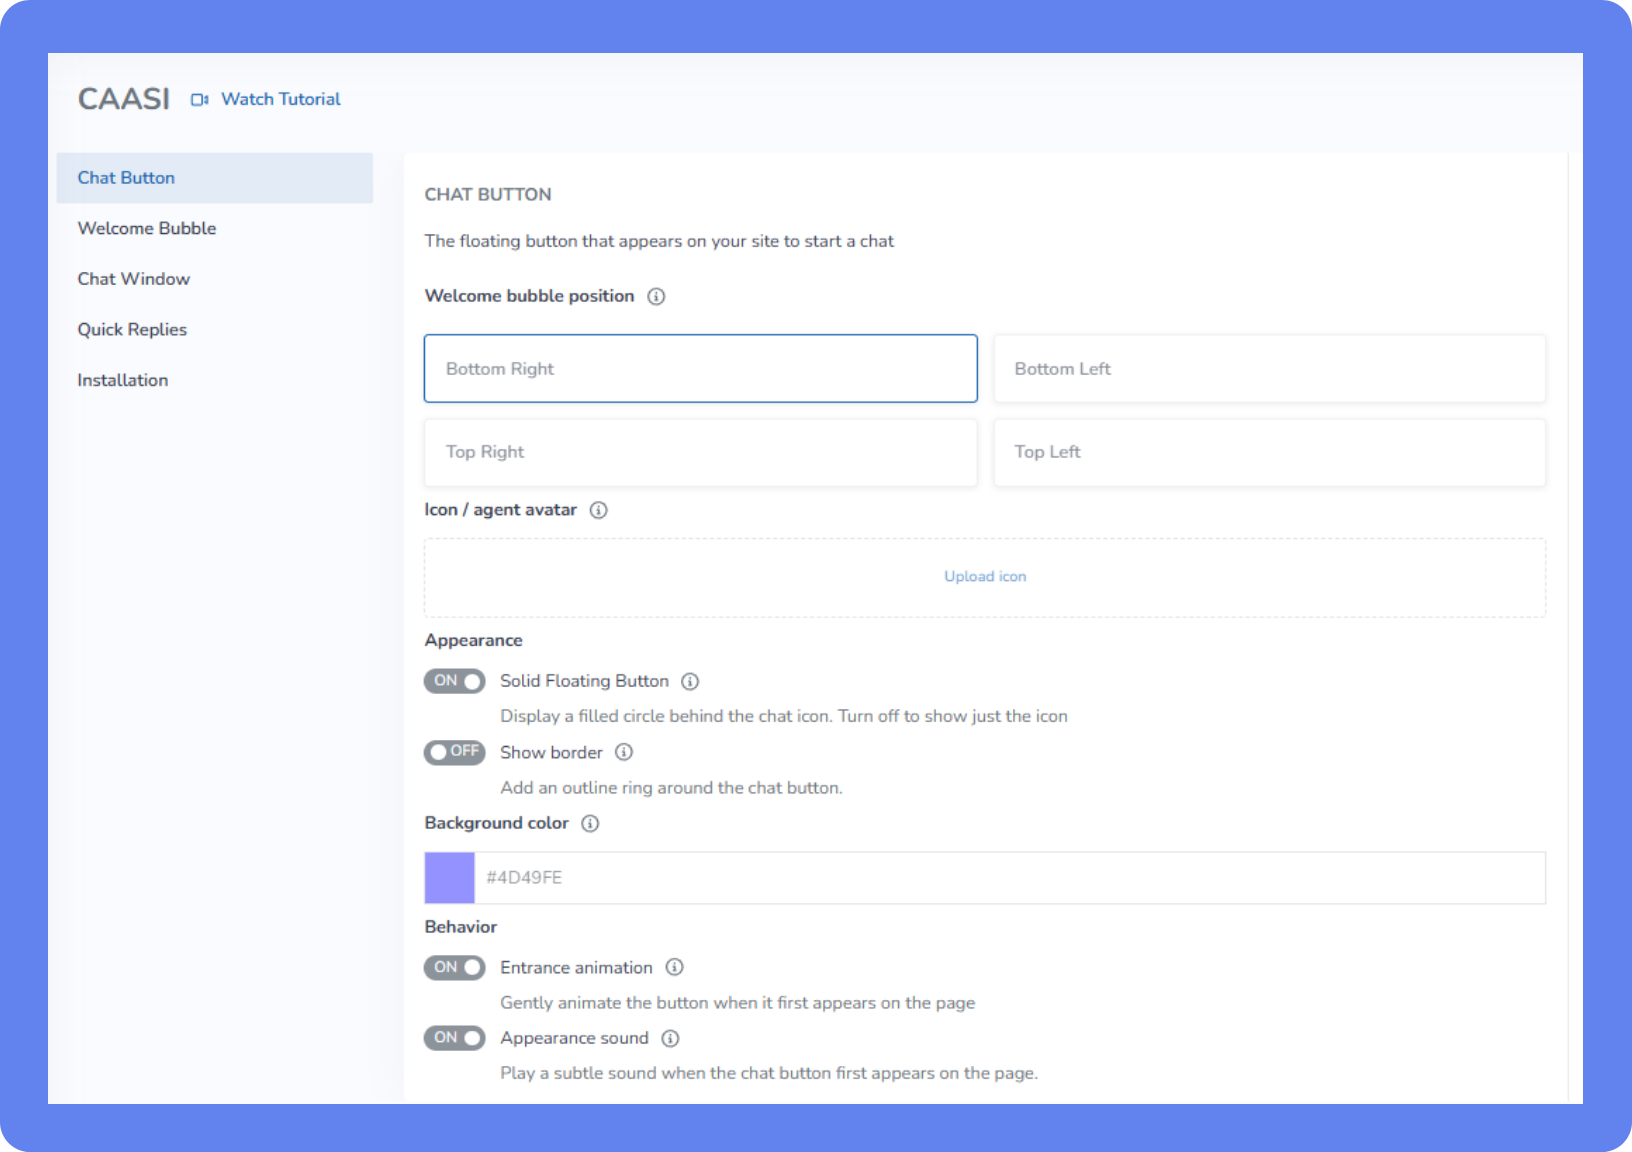
To customize CAASI’s widget appearance:
To customize the floating button clients use to start a conversation with CAASI on your website and Client Portal, click Chat Button.
Choose where the widget and bubble appear on your website by adjusting Welcome bubble position.
Choose or upload the Icon/agent avatar clients click to begin chatting.
Under Appearance:
Set Solid Floating Button to ON to display a colored circle behind the icon.
Set Show border to ON to add a white border to the icon.
Choose the Background color for the icon.
Choose whether the icon should show an Entrance animation when clients visit the page or receive a message.
Choose whether an Appearance sound should play when clients visit the page.
To customize the message that appears to clients before opening CAASI, click Welcome Bubble.
Choose whether you the want the Welcome Bubble Appearance to be a Rich Card with detail or a simplified Text bubble.
Choose where the widget button should be in relation to the bubble by adjusting the Bubble position.
For Rich Card bubbles:
Enter the Welcome title that appears at the top of the widget.
Enter the Welcome message CAASI sends to prompt clients to begin a conversation.
Enter the Call-to-action button text clients can click to begin a conversation with CAASI.
Choose whether you want to Customize Bubble Colors. If so, choose the Title Color and Theme Color.
To customize the window clients use to talk to CAASI, click Chat Window.
The AI Agent Name you set up in CAASI Preferences appears. To change the name, see Customize CAASI’s personality. Name changes are limited to one page to ensure a single, consistent name across all channels and conversations.
Enter the Welcome message CAASI sends to prompt clients to begin a conversation.
Choose the Primary color to determine the colors of the frame and chat bubbles.
Choose the Secondary color. We recommend choosing a color that contrasts with the selected Primary color for easier navigation.
Choose the desired Font.
Choose or upload a Brand Logo to appear at the top of the widget.
Choose or upload a AI Agent Avatar to appear with CAASI’s messages.
To add or modify text options clients can click to quickly respond to CAASI, click Quick Replies.
Choose the Button color clients will see with the replies.
Set Enable quick replies to ON to allow clients to use the replies.
Click Add items to add a new option. You can have up to 10 quick replies.
Click Delete next to an option to remove it.
Under Button Label, enter the text of the reply the client will see.
Under Message to CAASI, enter the text of the reply that’s sent to CAASI. This can differ from the display text. For example, use shorter, click-friendly wording for users, while providing a more detailed, instructional message to CAASI to guide its response.
To embed CAASI on your website, click Installation. For more information, see Embed CAASI on your website.
Click Save.