
A Schedule Widget displays your classes and events so clients can book without visiting your website directly. You can share a link to your Custom Schedule Widget instead of embedding it, which is handy for emails, text messages, social media bios, and QR codes on printed materials.
Key tips
Before you begin, ensure you have at least one Schedule Widget skin created.
If you're using the legacy version of this widget, found under Setup > Unsupported Widgets, we recommend switching to the updated version instead. The updated version uses a modern framework for additional functionality and resolves common issues like flickering or improper rendering.
Share a link for the updated Schedule Widget
To copy a shareable link to the updated Schedule Widget:
Open the App Drawer
 then click Setup > Website Widgets > 🟢 Schedule.
Click the skin you want to share, or click +Add skin to create a new one.
In the top right corner, click Embed Code.
Under Direct link, find the Shareable URL field.
Click the copy icon inside the field to copy the link to your clipboard. A Link copied confirmation appears briefly.
Paste the link wherever you want to share it, such as an email, a text message, a social media bio, or a QR code generator.
Share a link for the legacy Custom Schedule Widget
To generate a shareable link for the legacy Custom Schedule Widget:
Click the App Drawer button
then View All > Setup > Unsupported Widgets > 🟠 Custom Schedule.
Select the custom schedule widget you want to share the link to. If you don’t have a custom schedule widget, create one before continuing.
At the top of the page, click Embed code.
In the Widget Code box, select all the content and copy it to your clipboard.
Open a plain text editor application (e.g., Notepad or TextEdit) and paste in the widget code.
Save the plain text file to your computer and change the file name to widgetname.html.
Open the saved widget file on your web browser.
Right-click on the screen and select Inspect.
Open the search pane by pressing CTRL+F on Windows or CMD+F on Mac OS and search for the element iframe and locate the link within that element. Below is an example of what the element should look like:
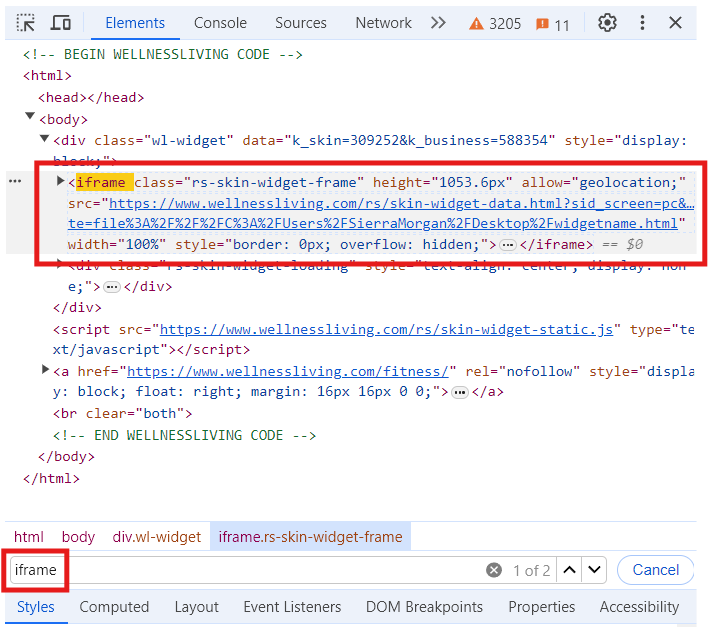
Right-click on the link and select Copy link address. This generates a shareable Custom Schedule link.
Copy and paste that link into the address bar on your web browser to display the Custom Schedule.